


Advanced Scheduling Functionality
If you’re passed the point of creating and approving a schedule, then it’s time to learn some of eSchedule’s more advanced features. This blog post should contain at least a couple of hacks you haven’t tried before… and if not? Well then you’re already an employee scheduling expert!
You can also follow along with the step-by-step video tutorial. Just click the button below:
Schedule Views
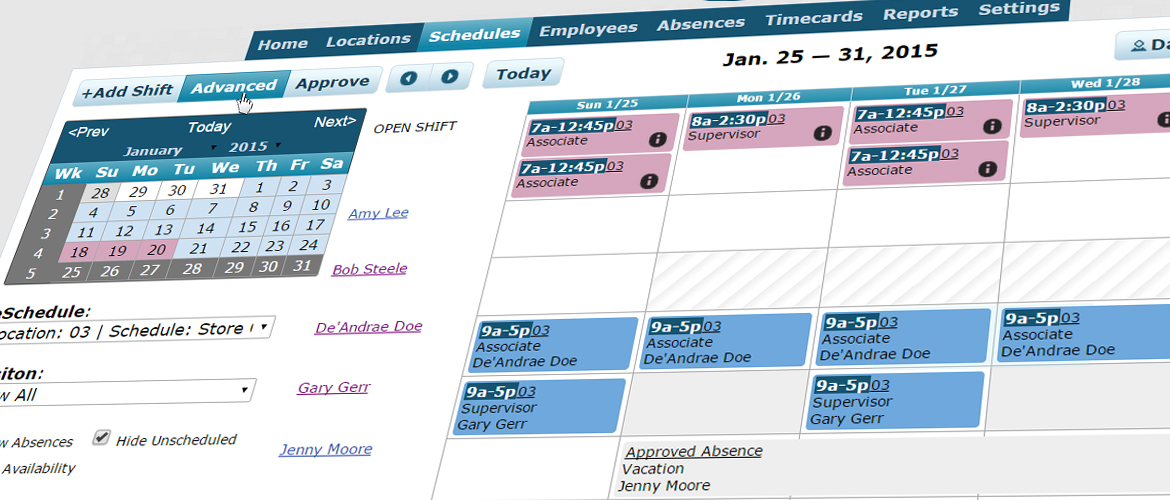
You’re likely already familiar with the “View 1” and “View 2” options when you want to edit your schedule, but did you know there are actually six different views you can choose from when you click “View 2”? You can see all six highlighted in the image below. I suggest checking out each of them and am sure you will be able to find a favorite that best fits your scheduling requirements!

Filters and Colors for Full Customization
On the bottom left side of the “View 2” image above, you can see various options to filter and customize your schedule with.
- Check “show absences” to display all pending and approved time-off requests directly on the schedule.
- Hide unscheduled will only affect the first four views (day, week, month and two weeks by employee) by only displaying employees that have shifts during the period selected.
- Show availability also only affects the first four views and gives a visual representation of when each of your employees can be scheduled
- You can also denote a different color to represent each status on your schedule
Multiple Shifts Shortcut
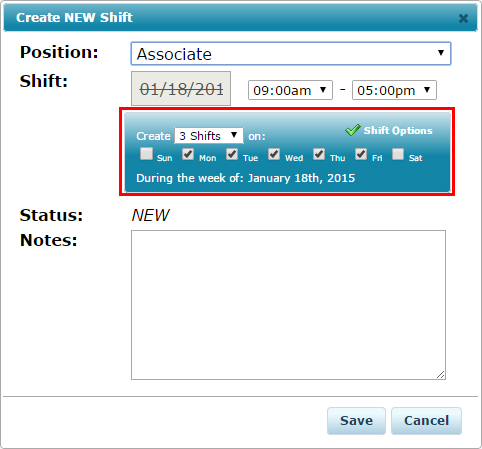
This functionality provides a quick way to create multiple of the same open shifts, rather than using a template. Say for instance that you noticed a sudden increase in customer demand and didn’t have the necessary employee coverage to meet it. With a couple clicks, you can add up to ten open shifts during this peak period, and automatically notify all available employees of the new shifts.
To do this, just click the “add shift” button or click an empty space in the calendar. This will pull up the “create NEW shift” modal, where you just need to select the position required and shift time. Next click “shift options” to choose how many of that shift you would like to create and on which days that week. Once you click “save”, the open shifts will be added to your schedule and if your schedule is already approved, they will be sent out to your available staff.
Copy Shifts
Copying shifts is a real time saver if you have a recurring schedule each week. This option can be found under the “advanced” menu in View 2 of your schedule. All you have to do is select the dates of already created schedule to copy from, and then select which dates to copy these shifts to.
Maybe you just had a perfect week of shift coverage, and want to replicate that into next week. The shifts will copy over identically, including the employees that were assigned to each. If any employee happens to be unavailable, they will be replaced by an open shift which can then be filled with someone else.
Drag and Drop
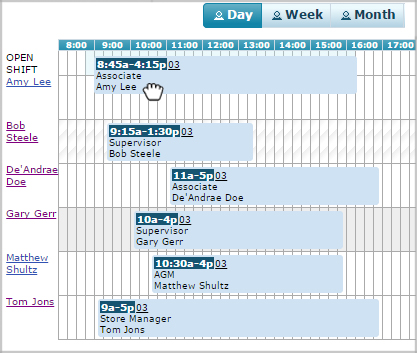
In View 2 of your schedule, you have the ability to drag and drop shifts to different days, or to assign them to different employees (depending on which view you select). Here is what this function can do in all six of the different views:
Day by employee view:
- Drag assigned shifts or open shifts to different employees to assign them to it
- Mouse over the end of the shift and drag it to change the time the shift finishes
- Drag shifts left or right to change the start and end time
Week, Month, 2 Weeks by employee view:
- Drag assigned shifts or open shifts to different employees to assign them to it
- Drag shift to a different day to change when it occurs
Month, Week by shift view:
- Drag shift to a different day to change when it occurs
Bulk Update Hours
On the “Employees” page, you may have noticed a checkmark next to each of your staff and a “bulk update” button at the bottom of the list. This provides a shortcut to update the maximum hours/week setting across multiple employee profiles.
Maybe half your staff is part time… just check off the ones that are and set their hours all at once. If the other half is full-time, you can set the remaining employees to 40hrs/wk so that you avoid any overtime expenses. The system will automatically prevent employees from being scheduled over their max hours.